Getting started - Authorization and Creation of a User Identity
finAPI follows the OAuth 2.0 Standard for authorizing applications and users within them. OAuth uses the terminology of clients and users. A client represents an application that calls finAPI services. A service call might be in the context of a user of the client (e.g: getting a user's bank connections), or outside any user context (e.g.: editing your client's configuration, or creating a new user for your client). In any case, every service call must be authorized by an access_token. The documentation below describes how to set up the client's users, or for the client itself.
finAPI Access Environments
For testing purposes on the GiroIdent sandbox, the following Access instance has to be used: https://sandbox.finapi.io. In the case of using Plus or GwG product variants using SCHUFA services, the sandbox will be connected to SCHUFA’s test environment.
finAPI Process Controller
The finAPI Process Controller instance in finAPI’s sandbox is https://di-processctl-finapi-general-sandbox.finapi.io. Please use this instance if you do not intend to integrate GiroIdent standalone in conjunction with other finAPI web services.
GiroIdent Use Cases
GiroIdent (GI) services can be easily integrated for one of the following use cases:
Usecase 1 - Standalone Usage: in this case, the finAPI Process Controller shall be used to start the GiroIdent process and to create an OAuth token.
Usecase 2 - Usage in combination with other finAPI services (e.g. Access or Data Intelligence): in this case, an access token of an existing user (identity) can be used
Use Case 1: GiroIdent as a Standalone Product
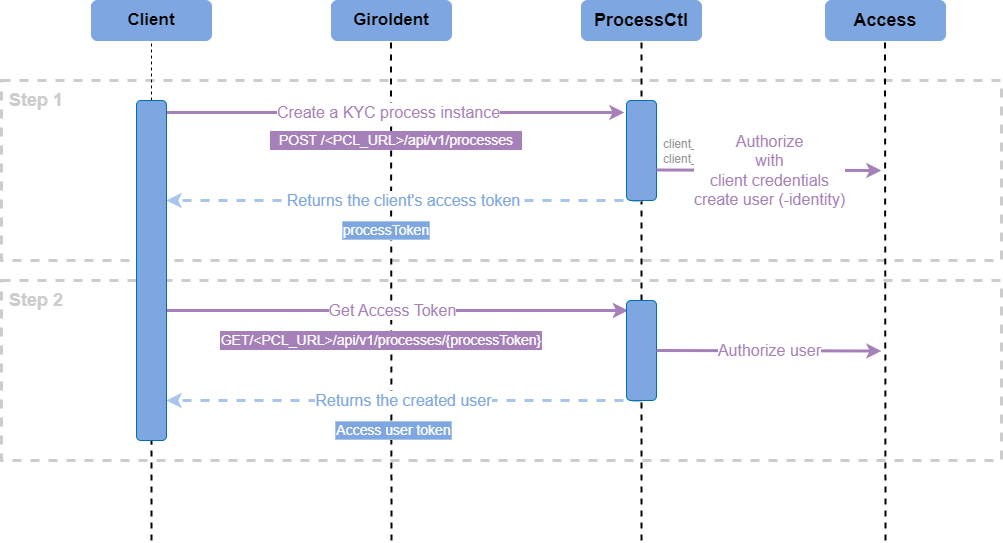
To simplify use cases that provide a one-time result - like the GiroIdent KYC check - finAPI introduced the Process Controller, which provides and manages an identity transparently for the customer with a simple two-step procedure. The Process Controller is a wrapper service on top of finAPI Access.
The major prerequisite is to have a valid set of client credentials: client_id and client_secret.
Step 1: Starting (KYC) Process and Getting Authorized
A process is created by calling the finAPI Process Controller POST <PCL_URL>/api/v1/processes endpoint using the customer OAuth client credentials (and a client reference identifying the customer’s implementation):
{
  "clientId": "8f92e604-b9b9-11ec-8422-0242ac120002",
  "clientSecret": "8f92ea14-b9b9-11ec-8422-0242ac120002",
  "clientReferences": [
    {
      "clientReference": "<customer-reference>"
    }
  ],
  "processId": "GIROIDENT"
}
The response will refer to the customer reference and include a process token, that identifies the process instance.
{
  "processes": [
    {
      "clientReference": "<customer-reference>",
      "processToken": "8f92ec58-b9b9-11ec-8422-0242ac120002"
    }
  ]
}
Step 2: Get the OAuth Token
With the process token, the (finAPI Access-) user OAuth token (required to get authorised GiroIdent API calls) can be retrieved from the Process Controller endpoint GET <PCL_URL>/api/v1/processes/{process-token}?invalidate=true.
The response will look like this:
{
  "accessToken": "89e3b64c-b9ba-11ec-8422-0242ac120002"
}
For a default GiroIdent standalone use-case it is sufficient to get the token only once. For security reasons, we recommend to set the invalidate query parameter to true. This will
prevent that further tokens can be obtained
that the user identity is deleted after one day (otherwise: 30 days)
Use Case 2: Using GiroIdent Together With Other finAPI Products
Step 1: Get authorized as a client in Access
The major prerequisite for getting authorized as a client (i.e application) is having a valid set of client credentials: client_id and client_secret.
To get authorized as a client, make a call to Access POST <ACCESS_URL>/api/v2/oauth/token and pass the following request parameters:
grant_type=client_credentialsclient_idclient_secret
The client authorization request response:
{
  "access_token": "fnsXpguIBkChhCsN8bVty9Y68AsUvJYyXUILcsFBvWABF03k8Ov68Ev2BTyANuBjyX8r9XuuTajNM2zZnhZMDjKWHN4lbRSRcVhg9_PcE7eeXHm0t28ZjzM4TJlrupZD",
  "token_type": "bearer",
  "expires_in": 3599,
  "scope": "all"
}
To get authorized as a Client, use the obtained access_token as input for Access QUICK AUTH.
Step 2: Create an Access user
The major prerequisite for creating a user is getting authorized as a client with the help of the obtained access_token in Step 1.
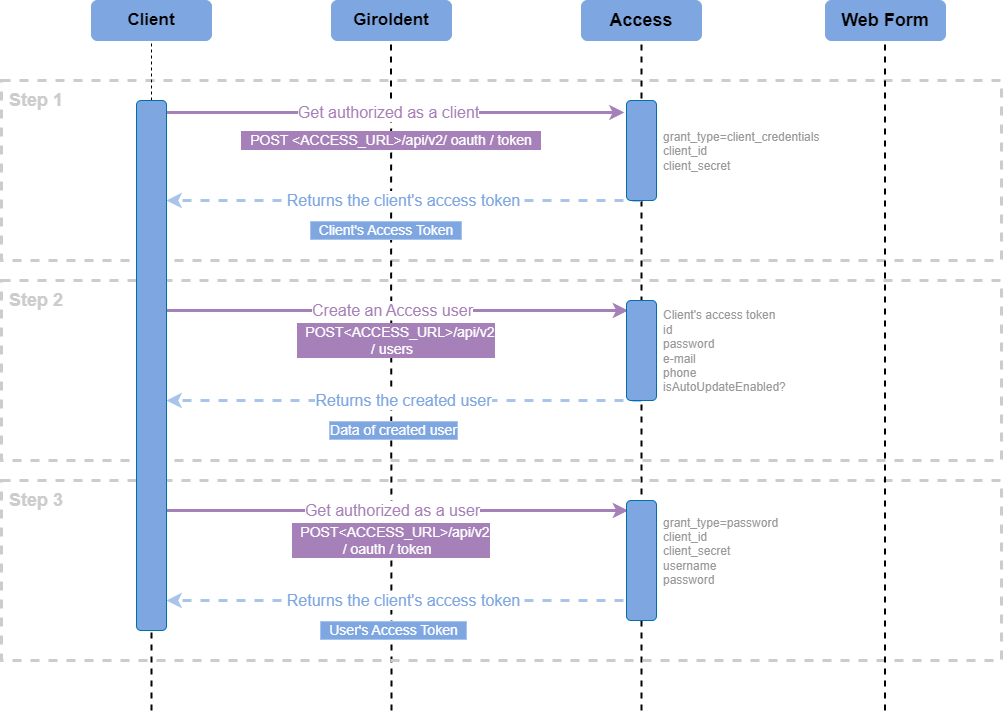
To create a user, make a call to Access POST /users and pass the following request body:
{
  "id": "username",
  "password": "password",
  "email": "email@localhost.de",
  "phone": "+49 99 999999-999",
  "isAutoUpdateEnabled": false
}
The user creation request response:
{
  "id": "username",
  "password": "password",
  "email": "email@localhost.de",
  "phone": "+49 99 999999-999",
  "isAutoUpdateEnabled": false
}
Step 3: Get authorized as a user
The major prerequisite for creating a user is getting the user’s data, such as password and id (username) from Step 2.
To get authorized as a user, make a call to Access POST <ACCESS_URL>/api/v2/oauth/token and pass the following request parameters:
grant_type=passwordclient_idusernamepassword
The user authorization request response:
{
  "access_token": "nnsXpguIBkChhCsN8bVty9Y68AsUvJYyXUILcsFBvWABF03k8Ov68Ev2BTyANuBjyX8r9XuuTajNM2zZnhZMDjKWHN4lbRSRcVhg9_PcE7eeXHm0t28ZjzM4TJlrupZD",
  "token_type": "bearer",
  "expires_in": 3599,
  "scope": "all"
}
To get authorized as a User, use the obtained access_token
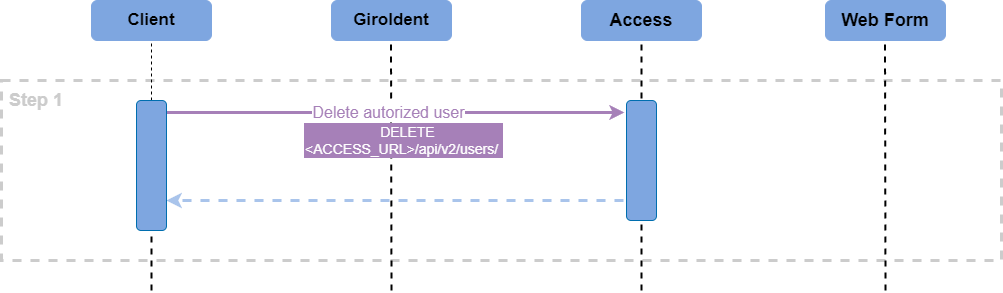
Post Step: Deleting the User Identity
Please use Delete the authorised user service in Access (if your overall use case requires this step at a certain final point).
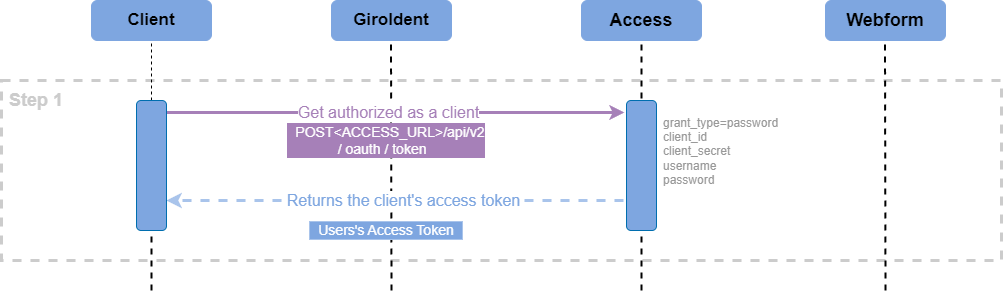
Use of an Existing User Identity
If you experience any problems during the integration or have any questions, please contact our support, support@finapi.io at any time. Our customer success team is looking forward to supporting you during your integration journey.