Authorization and Creation of a User Identity
finAPI follows the OAuth 2.0 Standard for authorizing applications and users within them. OAuth uses the terminology of clients and users. A client represents an application that calls finAPI services. A service call might be in the context of a user of the client (e.g: getting a user's bank connections), or outside any user context (e.g.: editing your client's configuration, or creating a new user for your client). In any case, every service call must be authorized by an access_token.
Authorization flow
The following diagram visualizes the steps needed to be performed and the specific flow of requests and returns inside each step.
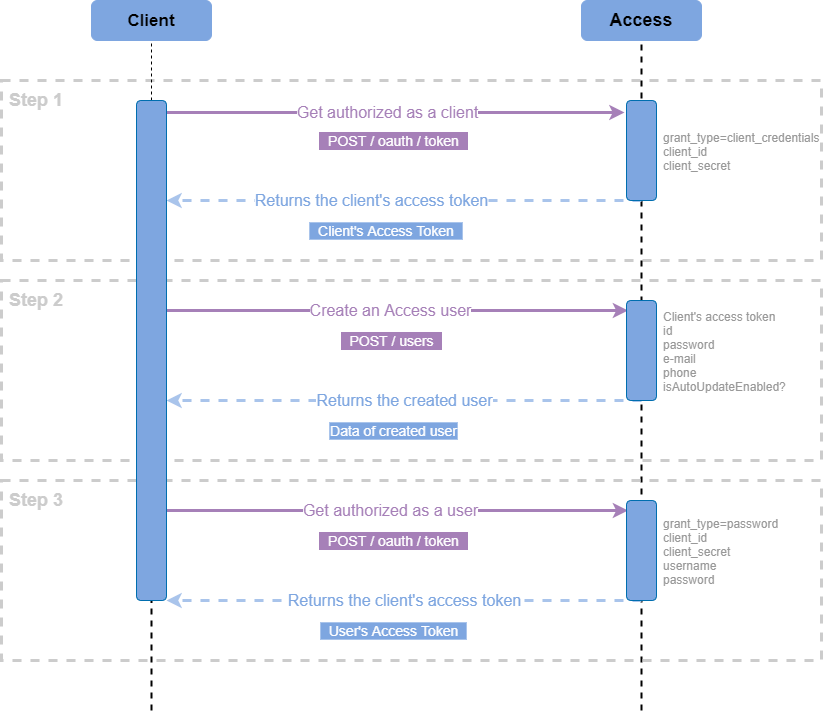
Step 1: Get authorized as a client in Access
The prerequisite for getting authorized as a client (i.e application) is having a valid set of client credentials: client_id and client_secret.
To get authorized as a client, make a call to Access POST /oauth/token and pass the following request parameters:
grant_type=client_credentialsclient_idclient_secret
The client authorization request response:
{
  "access_token": "fnsXpguIBkChhCsN8bVty9Y68AsUvJYyXUILcsFBvWABF03k8Ov68Ev2BTyANuBjyX8r9XuuTajNM2zZnhZMDjKWHN4lbRSRcVhg9_PcE7eeXHm0t28ZjzM4TJlrupZD",
  "token_type": "bearer",
  "expires_in": 3599,
  "scope": "all"
}
If you are using Open API UI, to get authorized as a Client, use the obtained access_token as input for QUICK AUTH.
Step 2: Create an Access user
The major prerequisite for creating a user is getting authorized as a client with the help of the obtained access_token in Step 1.
To create a user, make a call to Access POST /users and pass the following request body:
{
  "id": "username",
  "password": "password",
  "email": "email@localhost.de",
  "phone": "+49 99 999999-999",
  "isAutoUpdateEnabled": false
}
The user creation request response:
{
  "id": "username",
  "password": "password",
  "email": "email@localhost.de",
  "phone": "+49 99 999999-999",
  "isAutoUpdateEnabled": false
}
Step 3: Get authorized as a user
The major prerequisite for creating a user is getting the user’s data, such as password and id (username) from Step 2.
To get authorized as a user, make a call to Access POST /oauth/token and pass the following request parameters:
grant_type=passwordclient_idclient_secretusernamepassword
The user authorization request response:
{
  "access_token": "nnsXpguIBkChhCsN8bVty9Y68AsUvJYyXUILcsFBvWABF03k8Ov68Ev2BTyANuBjyX8r9XuuTajNM2zZnhZMDjKWHN4lbRSRcVhg9_PcE7eeXHm0t28ZjzM4TJlrupZD",
  "token_type": "bearer",
  "expires_in": 3599,
  "scope": "all"
}
If you are using Open API UI, to get authorized as a User, again use the obtained access_token as input for QUICK AUTH.
At finAPI, we develop our own integrated high-level Open API UI that abstracts away paths and low-level technical details as well as constantly enhance its UI in order to make sure it is the simplest to use. Our customers just have to enter some values to authorize themselves, once done our API services will start working immediately.
However, in case you prefer to use some other lower-level external REST-tools, we would like to draw your attention to the CURL section in the Response of each Request (more specifically, in the Response area of each Request, the CURL section is next to the Response Headers section to the right). There you can see the low-level Request that was generated by each specific API call. This "CURL" request is in general similar to how you should execute the same API call using Postman. Therefore, it can be a good reference when it comes to using external REST-tools.