Introduction
Aggregations offer a simple way to bring transactions of different labels into one overview and to perform cash flow analysis depending on the order.
Prerequisites
-
The major prerequisite is to have a valid set of client credentials:
client_idandclient_secret. -
A user has already been created
-
With self-managed user: Getting Started - User Management
-
With Process Controller: Obtain Authorization via Process Controller (recommended)
-
-
At least one account has already been imported via finAPI WebForm 2.0 (see WebForm Documentation)
TL:TR
Used Systems
-
finAPI Data Intelligence (finAPI API Documentation)
See Environments page for detailed information.
Used Endpoints
To create a report, at least the following endpoints are required:
|
Description |
HTTP Method |
Process Controller Endpoint |
Link to API Doc |
|---|---|---|---|
|
Synchronize Data Source |
POST |
|
|
|
Get status of the Data Source
|
GET |
|
|
|
Create a case |
POST |
|
|
|
Create Aggregation |
POST |
|
Process Overview
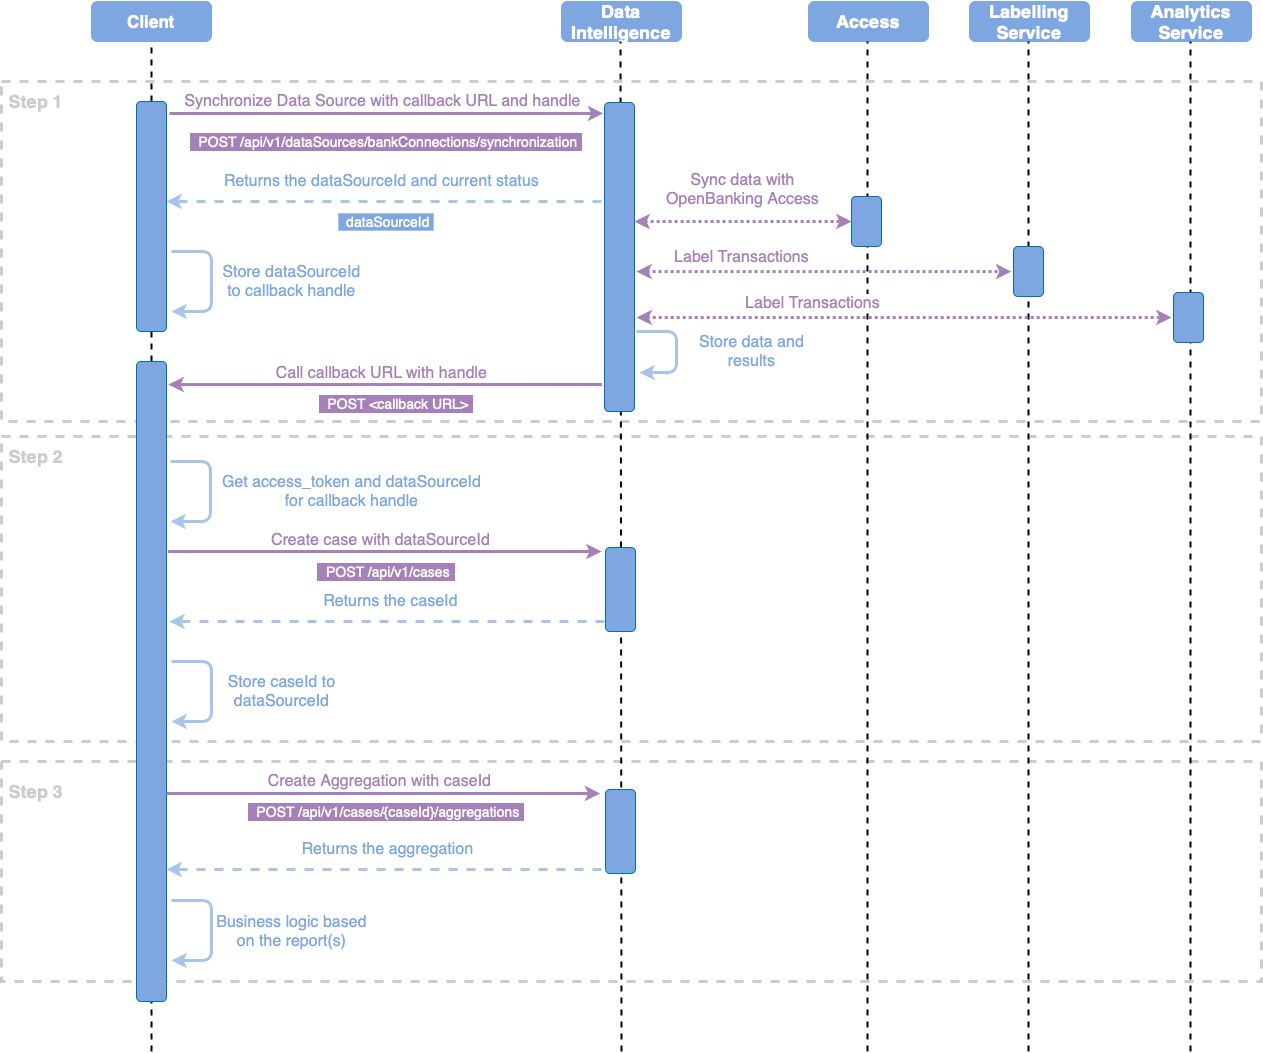
cURL Example
Translated into cURL it looks like the following:
Step 1 - Synchronize Data Source (cURL)
Before you can synchronize data in Data Intelligence, it must already have been imported via finAPI WebForm 2.0 or finAPI OpenBanking Access.
For synchronization, it is recommended that the callback is used to avoid unnecessary poll requests that can stress client and server systems.
Synchronization request example for full synchronization of the user:
curl --location 'https://di-sandbox.finapi.io/api/v1/dataSources/bankConnections/synchronization' \
--header 'Content-Type: application/json' \
--header 'Authorization: Bearer <access_token>' \
--data '{
  "callbackUrl": "https://domain.tld",
  "callbackHandle": "38793e87-499d-4860-b947-2c2c8ab10322"
}'
The response looks like this:
{
  "bankConnections": [
    {
      "dataSourceId": "4e760145-2e65-4242-ac33-488943528c93",
      "creationDate": "2020-01-01 00:00:00.000",
      "lastUpdate": "2020-01-01 00:00:00.000",
      "externalId": 123456,
      "bic": "COBADEFFXXX",
      "bankName": "Commerzbank",
      "bankStatus": "IN_PROGRESS",
      "updateRequired": false,
      "accounts": [
        {
          "accountId": "5f660145-2e65-4242-ac33-488943528c93",
          "creationDate": "2020-01-01 00:00:00.000",
          "lastUpdate": "2020-01-01 00:00:00.000",
          "externalId": 123456,
          "iban": "DE13700800000061110500",
          "accountType": "CHECKING",
          "status": "UPDATED"
        }
      ]
    }
  ]
}
Step 1.5 - Polling the status of the Data Source (cURL)
It is not recommended to poll the status. If you still want to do it, please make sure that there is at least a 200ms pause between requests.
Request to the Data Source status:
curl --location 'https://di-sandbox.finapi.io/api/v1/dataSources/{dataSourceId}/status' \
--header 'Authorization: Bearer <access_token>'
The response looks like this:
{
  "status": "IN_PROGRESS",
  "code": "SYNC_IN_PROGRESS",
}
As long as the status is not SUCCESSFUL, you cannot proceed with report creation.
Step 2 - Create a Case (cURL)
A case requires one or more data sources. This allows the reports to know which accounts should be used.
It can also restrict the time period with maxDaysForCase or datePeriodForCase elements.
The withTransactions element can be used here to define the default behavior of the reports transaction output later.
Request to create a case with maxDaysForCase:
curl --location 'https://di-sandbox.finapi.io/api/v1/cases' \
--header 'Content-Type: application/json' \
--header 'Authorization: Bearer <access_token>' \
--data '{
  "dataSourceIds": [
    "4e760145-2e65-4242-ac33-488943528c93"
  ],
  "maxDaysForCase": 89,
  "withTransactions": true
}'
Request to create a case with datePeriodForCase:
curl --location 'https://di-sandbox.finapi.io/api/v1/cases' \
--header 'Content-Type: application/json' \
--header 'Authorization: Bearer <access_token>' \
--data '{
  "dataSourceIds": [
    "4e760145-2e65-4242-ac33-488943528c93"
  ],
  "datePeriodForCase": {
    "dateFrom": "2023-01-01",
    "dateTo": "2023-02-01"
  },
  "withTransactions": true
}'
The response for maxDaysForCase looks like this:
{
  "id": "0b5d1980-63ec-4f3c-bbcf-dd81b044d580",
  "maxDaysForCase": 89,
  "creationDate": "2023-02-01 00:00:00.000",
  "dataSources": [
    {
      "id": "4e760145-2e65-4242-ac33-488943528c93",
      "creationDate": "2020-01-01 00:00:00.000"
    }
  ]
}
Step 3 - Create Aggregation
Now we can create an aggregation.
In this example, we create in the first view "Real estate loans" and in the second one "Other loans".
curl --location 'https://di-sandbox.finapi.io/api/v1/cases/0b5d1980-63ec-4f3c-bbcf-dd81b044d580/aggregations' \
--header 'Content-Type: application/json' \
--header 'Authorization: Bearer <access_token>' \
--data '{
  "aggregations": [
    {
      "alias": "Real estate loans",
      "includeLabelGroup": [
        "REALESTATELOAN"
      ]
    },
    {
      "alias": "Other loans",
      "includeLabelGroup": [
        "LOANANDINTEREST"
      ]
    }
  ]
}'
0b5d1980-63ec-4f3c-bbcf-dd81b044d580 is the caseId.
The response looks like this:
{
    "aggregations": [
        {
            "alias": "Real estate loans",
            "totalTransactionsCount": 0,
            "totalIncome": 0,
            "totalSpending": 0,
            "totalAmount": 0
        },
        {
            "alias": "Other loans",
            "totalTransactionsCount": 3,
            "totalIncome": 0,
            "totalSpending": -794.43,
            "totalAmount": -794.43,
            "firstTransactionDate": "2023-06-05 00:00:00.000",
            "lastTransactionDate": "2023-08-08 00:00:00.000",
            "monthlyData": {
                "totalMonthlyAmounts": [
                    {
                        "month": "2023-08",
                        "totalIncome": 0.00,
                        "totalSpending": -264.81,
                        "totalAmount": -264.81,
                        "transactionIds": [
                            "1050d45a-ac2f-45bc-8dd0-9068bbee5016"
                        ]
                    },
                    {
                        "month": "2023-07",
                        "totalIncome": 0.00,
                        "totalSpending": -264.81,
                        "totalAmount": -264.81,
                        "transactionIds": [
                            "a7a0313c-6e0f-4f22-bc32-e28a601afe4d"
                        ]
                    },
                    {
                        "month": "2023-06",
                        "totalIncome": 0.00,
                        "totalSpending": -264.81,
                        "totalAmount": -264.81,
                        "transactionIds": [
                            "af758e0e-dfa3-4bc1-a10f-62e59570a55b"
                        ]
                    }
                ],
                "minTotalMonthlyAmount": -264.81,
                "maxTotalMonthlyAmount": -264.81,
                "averageTotalMonthlyAmount": -264.81,
                "medianTotalMonthlyAmount": -264.81
            }
        }
    ],
    "completeMonths": [
        "2023-07",
        "2023-06"
    ]
}
Implementation Guide
See a full working project here: finAPI Data Intelligence Product Platform Examples (Bitbucket)
Code from this guide can be found here: finAPI Data Sources(Bitbucket), finAPI Cases (Bitbucket), finAPI Aggregations (Bitbucket)
Environment overview can be found here: Environments
The guidelines and the example project are written in Kotlin with Spring Boot. But it is easily adoptable for other languages and frameworks.
For the HTTP connection, we are using here plain Java HttpClient, to be not restrictive for the client selection and that everything is transparent.
Only the actual functionality is discussed in this guideline. Used helper classes or the models can be looked up in the source code.
However, we always recommend using a generated client from our API, which reduces the effort of creating models and functions to access the endpoints and eliminates potential sources of error.
To learn how to generate and apply the API client using the Process Controller "Create user and exchange with access_token" as an example, please see the Getting Started - Code Generator (SDK) Integration.
Please also note that the code presented here and also the repository is only an illustration of a possible implementation. Therefore, the code is kept very simple and should not be used 1:1 in a production environment.
Example Code Flow Description
The flow of this example is, that the application synchronizes the data source as soon as the user is done with his connection of the accounts in finAPI WebForm or finAPI OpenBanking Access.
Further processing is done asynchronously by the callback.
As soon as the callback arrives again, it is checked whether the result is positive.
If the callback is positive, the Case and the Aggregations are created in the background and the Aggregation is retrieved.
We are working with status updates in the local database. This database should be polled or streamed by the (frontend) application, to know if an error happened in the background or if the user can continue, because everything was successful.
Step 1 - Synchronize Data Source
This step is an extract from the Guide for Data Sources. More information can be found at Getting Started - Synchronize a Data Source.
Data sources are a central component and not just bound to reports. Therefore we create them in a neutral datasourcespackage: finAPI Data Sources(Bitbucket) (Data Source)
In this step, we create a simple service that starts the synchronization. In addition, we use a callback so that we don't have to poll for synchronization status.
First, we create a new class named DataSourceService. This gets the URL of finAPI Data Intelligence (incl. the base path /api/v1) and the domain of the own service for the callback.
As further classes we get the DataSourcesRepository and DiProcessesRepository passed. These classes are example database repositories. In the example, these classes are not discussed further because they only perform the required tasks in the example.
Last but not least we have an ObjectMapper which is used to map JSON into objects and vice versa.
The first function we create is createPostRequest(). This is passed the user access_token, the URI of finAPI Data Intelligence, and the body.
From the URI and the diURL, which we get via the constructor and the configuration, the method builds the final URL.
@Service
class DataSourceService(
    @Value("\${finapi.instances.dataintelligence.url}") private val diUrl: String,
    @Value("\${exampleapp.instances.callback.url}") private val callbackUrl: String,
    private val dataSourcesRepository: DataSourcesRepository,
    private val diProcessesRepository: ReportProcessesRepository,
    private val objectMapper: ObjectMapper
) {
    /**
     * Create a POST HttpRequest.
     */
    private fun createPostRequest(
        accessToken: String,
        endpointUri: String,
        body: String
    ): HttpRequest {
        return HttpRequest.newBuilder()
            // build URL for https://<data_intelligence><endpointUri>
            .uri(URI.create("${diUrl}${endpointUri}"))
            // set Content-Type header to application/json
            .header(HttpHeaders.CONTENT_TYPE, MediaType.APPLICATION_JSON_VALUE)
            .header(HttpHeaders.AUTHORIZATION, "Bearer $accessToken")
            // add the body
            .POST(
                // use empty body to sync all accounts
                HttpRequest.BodyPublishers.ofString(body)
            ).build()
    }

    companion object {
        private val log = KotlinLogging.logger { }
    }
}
Next, we add to the class the method that will start the synchronization.
Since synchronizing a Data Source is an asynchronous process, we must first create an internal processId which we will use as a callbackHandle.
We can use this later to identify and continue our process again via the callback.
Since some calls require parameters, we should also store these at the processId before synchronizing the data source, so that the callback knows directly what it has to do.
For this we have the object DiProcessEntity, which we pass to the syncDataSource() function.
You can find the code of those classes in the repository.
After that, we send the request and use the previously created function createPostRequest() to create the request.
The result is checked in this example with a simple static function to see if it matches 2xx. Otherwise, an exception is thrown and the process is completely aborted.
If this check is also successful, the body of the response is mapped into an object, and the data is saved.
In this example, we save the access_token as well, because we use it later for the callback.
In a production application, this should be encrypted so that no one can gain access to the client's data.
The syncDataSource() method gets the callbackPath from outside.
Reason for that is, that we can create different callback paths for different scenarios (e.g. Reports or Checks).
@Service
class DataSourceService(
    @Value("\${finapi.instances.dataintelligence.url}") private val diUrl: String,
    @Value("\${exampleapp.instances.callback.url}") private val callbackUrl: String,
    private val dataSourcesRepository: DataSourcesRepository,
    private val diProcessesRepository: DiProcessesRepository,
    private val objectMapper: ObjectMapper
) {
    /**
     * Synchronize the data sources.
     */
    @Throws(RuntimeException::class)
    fun syncDataSource(
        accessToken: String,
        callbackPath: String,
        processEntity: DiProcessEntity
    ): BankConnectionsResultModel {
        val client = HttpClient.newBuilder().build()

        // create the body for the request
        val body = DataSourceSyncRequestModel(
            callbackUrl = URI("${callbackUrl}${callbackPath}"),
            callbackHandle = processEntity.processId
        )

        // create a request object and send it to DI
        val response = client.send(
            // create request URI for https://<data_intelligence>/api/v1/dataSources/bankConnections/synchronization
            createPostRequest(
                accessToken = accessToken,
                endpointUri = CreateAndGetReportService.URI_DATA_SOURCE,
                body = objectMapper.writeValueAsString(body)
            ),
            HttpResponse.BodyHandlers.ofString()
        )

        // check for status code is 2xx or log and throw an exception
        StatusCodeCheckUtils.checkStatusCodeAndLogErrorMessage(
            response = response,
            errorMessage = "Unable to sync data source."
        )

        // return the object of the mapped result
        val bankConnectionsResult = objectMapper.readValue(response.body(), BankConnectionsResultModel::class.java)

        // save all data sources and the current token to the database.
        // the token is required when the asynchronous request of the callback is received to continue the process.
        if (bankConnectionsResult.bankConnections != null) {
            processEntity.status = EnumProcessStatus.SYNC_STARTED

            val dataSources: ArrayList<DataSourceEntity> = ArrayList()
            bankConnectionsResult.bankConnections.forEach {
                dataSources.add(
                    DataSourceEntity(
                        userId = accessToken,
                        dataSourceId = it.dataSourceId
                    )
                )
            }
            val dataSourceEntities = dataSourcesRepository.saveAll(dataSources)
            processEntity.dataSources.addAll(dataSourceEntities)

            // save the accessToken, so that the callback can continue.
            // please encrypt this in reality!
            processEntity.accessToken = accessToken
            diProcessesRepository.save(processEntity)
        }
        log.info { "[${processEntity.processId}] Synchronization with Data Intelligence started" }
        return bankConnectionsResult
    }

    [...]
}
With this, we would now be able to create the Data Sources.
Example to sync data sources for Reports:
// create a process entity, which will be stored, if the sync call was successful
val processEntity = DiProcessEntity(
    processId = UUID.randomUUID().toString(),
    status = EnumProcessStatus.SYNC_CREATED
)

// start synchronizing data sources
dataSourceService.syncDataSource(
    accessToken = accessToken,
    callbackPath = "${ReportCallbackApi.URI_BASEPATH}${ReportCallbackApi.URI_CB_DATASOURCE_REPORTS}",
    processEntity = processEntity
)
Example to sync data sources for Checks with parameters:
// create a process entity, which will be stored, if the sync call was successful
val processEntity = DiProcessEntity(
    processId = UUID.randomUUID().toString(),
    status = EnumProcessStatus.SYNC_CREATED,
    amount = BigDecimal.ONE
)

// start synchronizing data sources
dataSourceService.syncDataSource(
    accessToken = accessToken,
    callbackPath = "${CheckCallbackApi.URI_BASEPATH}${CheckCallbackApi.URI_CB_DATASOURCE_CHECKS}",
    processEntity = processEntity
)
It is important to note that we are referring to an implementation with callback here. Without callback, the state of the data source must be polled. This should always happen with a pause of at least 200ms. Only when the status is SUCCESSFUL may the creation of a case be continued.
The next step is to create a function for creating a case.
Step 2 - Create a case
This step is an extract from the Guide for Cases. More information can be found at Getting Started - Create a Case File.
Creating a case is the next step after creating a Data Source. First, we create a class called CaseService.
It requires the Data Intelligence URL, and our DiProcessesRepository, as well as the mandatory ObjectMapper.
We create a body for the case. We give it a list of the dataSourceIds, we’ve created and returned previously.
The dataSourceIds can also consist of accountId if a data source contains unwanted accounts. Internally, the system also resolves the data source to accounts.
If several data sources exist (e.g. a cash account and a joint account at different banks), all data source IDs can be specified.
All accounts will then be taken into consideration in the report.
The response is validated again. However, a possible exception is caught here in order to be able to store a clean error status (CASE_CREATION_FAILED) in the system. This can be very relevant in support cases.
Afterward, the original exception is thrown again.
If everything was ok, we update the status to CASE_CREATED and return the result, that we have access to the caseId in the caller function.
We need a createPostRequest() method here, which prepares the client request.
This could also be solved centrally, but here we use the methods in each class to make it a bit more understandable.
@Service
class CaseService(
    @Value("\${finapi.instances.dataintelligence.url}") private val diUrl: String,
    private val diProcessesRepository: DiProcessesRepository,
    private val objectMapper: ObjectMapper
) {

    /**
     * Create a case.
     */
    @Throws(RuntimeException::class)
    fun createCaseFile(
        accessToken: String,
        dataSourceIds: List<String>,
        processEntity: DiProcessEntity
    ): CaseResponseModel {
        log.info { "[${processEntity.processId}] Starting create a case..." }
        val client = HttpClient.newBuilder().build()

        // create body for the case
        val body = CaseRequestModel(
            dataSourceIds = dataSourceIds,
            withTransactions = true
        )

        // send request
        val response = client.send(
            // create request URI for https://<data_intelligence>/api/v1/cases
            createPostRequest(
                accessToken = accessToken,
                endpointUri = URI_CASES,
                body = objectMapper.writeValueAsString(body)
            ),
            HttpResponse.BodyHandlers.ofString()
        )

        // check for status code is 2xx or log and throw an exception
        try {
            StatusCodeCheckUtils.checkStatusCodeAndLogErrorMessage(
                response = response,
                errorMessage = "Unable to create case."
            )
        } catch (@Suppress("TooGenericExceptionCaught") ex: RuntimeException) {
            processEntity.status = EnumProcessStatus.CASE_CREATION_FAILED
            diProcessesRepository.save(processEntity)
            throw ex
        }

        // map the result
        val caseResponse = objectMapper.readValue(response.body(), CaseResponseModel::class.java)

        // save successful state for case creation
        processEntity.status = EnumProcessStatus.CASE_CREATED
        diProcessesRepository.save(processEntity)

        log.info { "[${processEntity.processId}] Finished create a case..." }
        return caseResponse
    }

    /**
     * Create a POST HttpRequest.
     */
    private fun createPostRequest(
        accessToken: String,
        endpointUri: String,
        body: String
    ): HttpRequest {
        return HttpRequest.newBuilder()
            // build URL for https://<data_intelligence><endpointUri>
            .uri(URI.create("${diUrl}${endpointUri}"))
            // set Content-Type header to application/json
            .header(HttpHeaders.CONTENT_TYPE, MediaType.APPLICATION_JSON_VALUE)
            .header(HttpHeaders.AUTHORIZATION, "Bearer $accessToken")
            // add the body
            .POST(
                // use empty body to sync all accounts
                HttpRequest.BodyPublishers.ofString(body)
            ).build()
    }

    companion object {
        private val log = KotlinLogging.logger { }
        const val URI_CASES = "/cases"
    }
}
Now we have finished the function that can create the case.
Next, we take care of the aggregation.
Step 3 - Create an Aggregation
Creating an aggregation is a simple request, which contains as a body a list of aliases and the labels they contain.
To tackle this step by step, we first require a POST request to keep this preparation out of the business code.
Preparation
We create the code for the aggregations in the AggregationService class.
This gets the DiProcessRepository via the constructor so that we can update the status of the process, as well as the CaseService, which we still need for the call for the creation of the case. Last but not least, an ObjectMapper to be able to convert JSON into objects.
@Service
@Suppress("TooGenericExceptionCaught")
class AggregationService(
    @Value("\${finapi.instances.dataintelligence.url}") private val diUrl: String,
    private val diProcessesRepository: DiProcessesRepository,
    private val caseService: CaseService,
    private val objectMapper: ObjectMapper
) {
    /**
     * Create a POST HttpRequest.
     */
    private fun createPostRequest(
        accessToken: String,
        endpointUri: String,
        body: String
    ): HttpRequest {
        return HttpRequest.newBuilder()
            // build URL for https://<data_intelligence><endpointUri>
            .uri(URI.create("${diUrl}${endpointUri}"))
            // set Content-Type header to application/json
            .header(HttpHeaders.CONTENT_TYPE, MediaType.APPLICATION_JSON_VALUE)
            .header(HttpHeaders.AUTHORIZATION, "Bearer $accessToken")
            // add the body
            .POST(
                // use empty body to sync all accounts
                HttpRequest.BodyPublishers.ofString(body)
            ).build()
    }

    companion object {
        private val log = KotlinLogging.logger { }
        const val URI_CASES = "/cases"
        const val URI_AGGREGATIONS = "/aggregations"
    }
}
Create the aggregation
Now we extend this class with the function createAggregation().
This should create the actual aggregation.
First, we create a list, which should contain our views with the aliases and labels.
In this example, this is a list of AggregationDataRequestModel objects.
Then we add the desired aggregations to this list.
In this case, we want to have primarily the real estate loans. In addition, we need all other loans.
Aggregations build on each other. Information that has already been assigned cannot be assigned again.
This means that the order of the views/aliases determines with which priority transactions are assigned to which view.
In our example, this is very well illustrated, since LOANANDINTEREST is actually a label containing REALESTATELOAN.
However, by using REALESTATELOAN as the first element in the alias "Real estate loans", these transactions can no longer be assigned to the second alias "Other loans", even if this would normally contain these transactions.
The result will be a view that includes only the real estate loans and a second view with all other loans, excluding them.
@Service
@Suppress("TooGenericExceptionCaught")
class AggregationService(
    @Value("\${finapi.instances.dataintelligence.url}") private val diUrl: String,
    private val diProcessesRepository: DiProcessesRepository,
    private val caseService: CaseService,
    private val objectMapper: ObjectMapper
) {
    /**
     * Create an aggregation.
     */
    @Throws(RuntimeException::class)
    fun createAggregation(
        accessToken: String,
        caseId: String,
        processEntity: DiProcessEntity
    ): AggregationResponseModel {
        log.info { "[${processEntity.processId}] Starting create an aggregation..." }
        val client = HttpClient.newBuilder().build()

        // create the aggregation views
        val aggregations = ArrayList<AggregationDataRequestModel>()
        // -- add a view for real estate loans
        aggregations.add(
            AggregationDataRequestModel(
                alias = "Real estate loans",
                includeLabelGroup = listOf(
                    EnumLabel.REALESTATELOAN
                )
            )
        )

        // -- add a view for other loans
        aggregations.add(
            AggregationDataRequestModel(
                alias = "Other loans",
                includeLabelGroup = listOf(
                    EnumLabel.LOANANDINTEREST
                )
            )
        )

        // create body for reports
        val body = AggregationRequestModel(
            aggregations = aggregations
        )

        // send the request
        val response = client.send(
            // create request URI for https://<data_intelligence>/api/v1/cases/{caseId}/aggregations
            createPostRequest(
                accessToken = accessToken,
                endpointUri = "${URI_CASES}/${caseId}${URI_AGGREGATIONS}",
                body = objectMapper.writeValueAsString(body)
            ),
            HttpResponse.BodyHandlers.ofString()
        )

        // check for status code is 2xx or log and throw an exception
        try {
            StatusCodeCheckUtils.checkStatusCodeAndLogErrorMessage(
                response = response,
                errorMessage = "Unable to create report."
            )
        } catch (ex: RuntimeException) {
            processEntity.status = EnumProcessStatus.AGGREGATION_CREATION_FAILED
            diProcessesRepository.save(processEntity)
            throw ex
        }

        // map the result
        val aggregationResponse = objectMapper.readValue(response.body(), AggregationResponseModel::class.java)

        // save successful state for case creation
        processEntity.status = EnumProcessStatus.AGGREGATION_FETCHED
        diProcessesRepository.save(processEntity)

        log.info { "[${processEntity.processId}] Finished create an aggregation..." }
        return aggregationResponse
    }

    [...]
}
However, there is also the possibility to exclude higher level of detail labels from an aggregation.
For example, if you only want to display loans that are not real estate loans, the request can contain the excludeLabelGroup filter, and would look like this:
aggregations.add(
    AggregationDataRequestModel(
        alias = "Other loans",
        includeLabelGroup = listOf(
            EnumLabel.LOANANDINTEREST
        ),
        excludeLabelGroup = listOf(
            EnumLabel.REALESTATELOAN
        )
    )
)
Create a control function, which can be called from the callback service
In the next step, we extend the class with the control function aggregations().
This now receives the data sources in addition to the token and the ProcessID.
First, it should fetch the process from the database using the processId. If this is not available, it is terminated by an exception.
If everything is ok, the case is created first and then our createAggregation() function is called.
This returns the result directly and can be saved or processed further.
@Service
@Suppress("TooGenericExceptionCaught")
class AggregationService(
    @Value("\${finapi.instances.dataintelligence.url}") private val diUrl: String,
    private val diProcessesRepository: DiProcessesRepository,
    private val caseService: CaseService,
    private val objectMapper: ObjectMapper
) {
    /**
     * Create an aggregation.
     */
    @Throws(RuntimeException::class)
    @Suppress("TooGenericExceptionThrown", "UnusedPrivateProperty")
    fun aggregations(
        accessToken: String,
        processId: String,
        dataSourceIds: List<String>
    ) {
        log.info { "[${processId}] Starting create the aggregation process..." }

        // fetch the process entity and check if it is available.
        val processEntity = diProcessesRepository.findFirstByProcessId(processId = processId)
            ?: throw IllegalArgumentException("Process ID not found.")

        // first, we create a case file
        val caseFileResult = caseService.createCaseFile(
            accessToken = accessToken,
            dataSourceIds = dataSourceIds,
            processEntity = processEntity
        )

        // now we create the aggregation
        val aggregationResult = createAggregation(
            accessToken = accessToken,
            caseId = caseFileResult.id,
            processEntity = processEntity
        )

        log.info { "[${processId}] Finished create the aggregation process..." }

        // save the result of the check in the database and/or inform the UI about the result
    }

    [...]
}
Create the Callback Service
With this, we have completely implemented the technical functionality.
The last thing we need is the callback service, which is called by finAPI Data Intelligence after synchronization of the data source.
This service is basically a simple REST API endpoint that is communicated to the Data Source finAPI Data Intelligence when synchronizing.
Once the data sources are synchronized, the system then calls this endpoint to start further processing.
In terms of content, the callback should still check whether all data sources have been updated. For this purpose, the status is changed and it is checked whether all data sources that belong to the processId are ready.
If this is the case, our previously created AggregationService is called with the function aggregations().
@RestController
class AggregationsCallbackApi(
    private val aggregationService: AggregationService,
    private val dataSourcesRepository: DataSourcesRepository,
    private val diProcessesRepository: DiProcessesRepository
) {
    @PostMapping("${URI_BASEPATH}${URI_CB_DATASOURCE_AGGR}")
    @Suppress("TooGenericExceptionThrown")
    fun dataSourceCallbackForAggregations(@RequestBody body: CallbackRequestModel) {
        // if the body does not contain a callback handle we throw an exception,
        // because we cannot assign it to another request
        if (body.callbackHandle == null) {
            throw RuntimeException("No callback handle provided.")
        }

        // if we could not find the handle, we do the same
        val processEntity = diProcessesRepository.findFirstByProcessId(
            processId = body.callbackHandle
        ) ?: throw RuntimeException("Unable to find the callback handle.")

        // validate if the request contains a successful state or something else
        if (validateDataSourceRequest(body)) {
            // that we've received a data source
            val dataSources = processEntity.dataSources
            val dataSourceIdList = ArrayList<String>()
            dataSources.forEach {
                if (it.dataSourceId == body.datasourceId) {
                    it.callbackReceived = true
                    dataSourcesRepository.save(it)
                    dataSourceIdList.add(it.dataSourceId)
                }
            }

            // if everything was updated, we can create the aggregation
            if (isAllCallbacksReceived(dataSources = dataSources)) {
                // figure out all data source ids
                processEntity.dataSources.forEach { _ ->
                    // Call aggregations
                    aggregationService.aggregations(
                        accessToken = processEntity.accessToken!!,
                        processId = body.callbackHandle,
                        dataSourceIds = dataSourceIdList
                    )
                }
            }
        } else {
            log.error {
              """
                [${body.callbackHandle}] has received the status [${body.datasource?.status}]
                with the code [${body.datasource?.code}]
                and message [${body.datasource?.message}]
              """.trimIndent()
            }
            // if the callback was not successful, we store it as error status
            processEntity.status = EnumProcessStatus.CALLBACK_FAILED
            diProcessesRepository.save(processEntity)
        }
    }

    private fun isAllCallbacksReceived(dataSources: List<DataSourceEntity>): Boolean {
        var result = true
        dataSources.forEach {
            if (!it.callbackReceived) {
                result = false
            }
        }

        return result
    }

    private fun validateDataSourceRequest(request: CallbackRequestModel): Boolean {
        return (request.callbackHandle != null &&
                request.datasourceId != null &&
                request.datasource != null &&
                EnumStatus.SUCCESSFUL == request.datasource.status)
    }

    companion object {
        private val log = KotlinLogging.logger { }
        const val URI_BASEPATH = "/callbacks"
        const val URI_CB_DATASOURCE_AGGR = "/dataSource/aggregations"
    }
}
With this, everything is available to start with Aggregations.
If the DataSourceService is called with the function syncDataSource() and the aggregation callback URL is given as the callback URL, all necessary requests are executed and the data is created and fetched.