Getting started (prerequisites)
The following section describes the technical steps to get started with the integration. It is an additional resource that completes our openAPI description of the REST API.
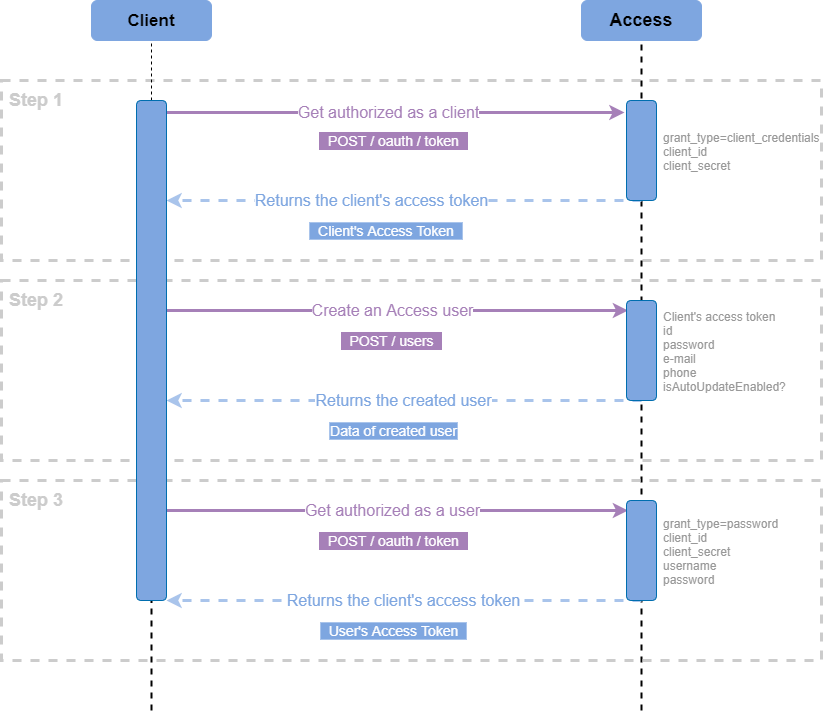
Web Form 2.0 services use Access in order to implement various workflows. The below steps are the prerequisites to use Web Form 2.0' REST services.
finAPI follows the OAuth 2.0 Standard for authorizing applications and users within them. OAuth uses the terminology of clients and users. A client represents an application that calls finAPI services. A service call might be in the context of a user of the client (e.g: getting a user's bank connections), or outside any user context (e.g.: editing your client's configuration, or creating a new user for your client). In any case, every service call must be authorized by an access_token. The documentation below describes how to set up client's users, or for the client itself.
Step 1: Get authorized as a client in Access
The major prerequisite for getting authorized as a client (i.e. application) is having a valid set of client credentials: client_id and client_secret.
To get authorized as a client, make a call to Access POST /oauth/token and pass the following request parameters:
grant_type=client_credentialsclient_idclient_secret
The client authorization request response:
{
  "access_token": "fnsXpguIBkChhCsN8bVty9Y68AsUvJYyXUILcsFBvWABF03k8Ov68Ev2BTyANuBjyX8r9XuuTajNM2zZnhZMDjKWHN4lbRSRcVhg9_PcE7eeXHm0t28ZjzM4TJlrupZD",
  "token_type": "bearer",
  "expires_in": 3599,
  "scope": "all"
}
To get authorized as a Client, use the obtained access_token as input for Access QUICK AUTH.
Step 2: Create an Access user
The major prerequisite for creating a user is getting authorized as a client with the help of the obtained access_token in Step 1.
To create a user, make a call to Access POST /users and pass the following request body:
{
  "id": "username",
  "password": "password",
  "email": "email@localhost.de",
  "phone": "+49 99 999999-999",
  "isAutoUpdateEnabled": false
}
The user creation request response:
{
  "id": "username",
  "password": "password",
  "email": "email@localhost.de",
  "phone": "+49 99 999999-999",
  "isAutoUpdateEnabled": false
}
Step 3: Get authorized as a user
The major prerequisite for creating a user is getting the user’s data, such as password and id (username) from Step 2.
To get authorized as a user, make a call to Access POST /oauth/token and pass the following request parameters:
grant_type=passwordclient_idusernamepassword
The user authorization request response:
{
  "access_token": "nnsXpguIBkChhCsN8bVty9Y68AsUvJYyXUILcsFBvWABF03k8Ov68Ev2BTyANuBjyX8r9XuuTajNM2zZnhZMDjKWHN4lbRSRcVhg9_PcE7eeXHm0t28ZjzM4TJlrupZD",
  "token_type": "bearer",
  "expires_in": 3599,
  "scope": "all"
}
To get authorized as a User, use the obtained access_token as an input for Web Form QUICK AUTH
Once the above steps are completed, any of the workflows related to AIS(Account Information Services) or PIS (Payment Initiation Services) can be triggered successfully either standalone (on a browser) or as an embedded Web Form.
If you experience any problems during the integration or have any questions, please contact our support, support@finapi.io at any time. Our customer success team is looking forward to supporting you during your integration journey.

