Web Form v1 Components
If you are a Web Form 2.0 customer who has stumbled upon this page, please navigate to the relevant pages: Embedded web form and Whitelabeling for Web Form 2.0
Purpose
We want to give our web form customers the possibility to embed and individualize our web form.
This might be achieved by using the finAPI Web Form Components.
Integrating the finAPI Web Form Components
We assume you have an HTML frontend application, in which you would like to embed the finAPI web form.
Using pure HTML solution
To begin with, you define a hidden input containing the web form’s token.
This token is a part of theLocationheader that is returned by the finAPI. This token must be extracted from the URL.HTML<input id="web-form-token" type="hidden" value="%web_form_token%" readonly />You add the following tag to your page which contains the finAPI web form itself:
HTML<web-form-element></web-form-element>Finally, you specify a link to the JavaScript file which is rendering the web form:
HTML<script id="web-form-components-source" src="https://alpha.finapi.io/js/web-form/web-form-components.es5.js"> </script>
The initialization order of the elements is important.
Before creating the <script> tag with a link to the web-form-components.es5.js file you must ensure the presence of the <web-form-element> tag and the <input> tag with the web-form’s token.
Keep in mind that web-form’s rendering begins after the page is loaded since it’s implemented as a callback for the window.onload event.
Using the npm package
Alternately, the web form components could be integrated by using our npm package.
In order to achieve it, you need to use the @finapi/embeddable-web-form package.
First off, you specify the required dependency
@finapi/embeddable-web-form: latestin yourpackage.jsonfile.Secondly, you import the class and use it to initialize the web-form components:
CODEimport {WebFormBuilder} from "@finapi/embeddable-web-form/finapi-embeddable-web-form";Finally, you provide the
WebFormBuilderobject with the URL to the finAPI server, the web-form’s token and the parent document object and call thestartWebFormComponents()method to start the initialization process.This screenshot illustrates an example of such integration with the Angular framework:
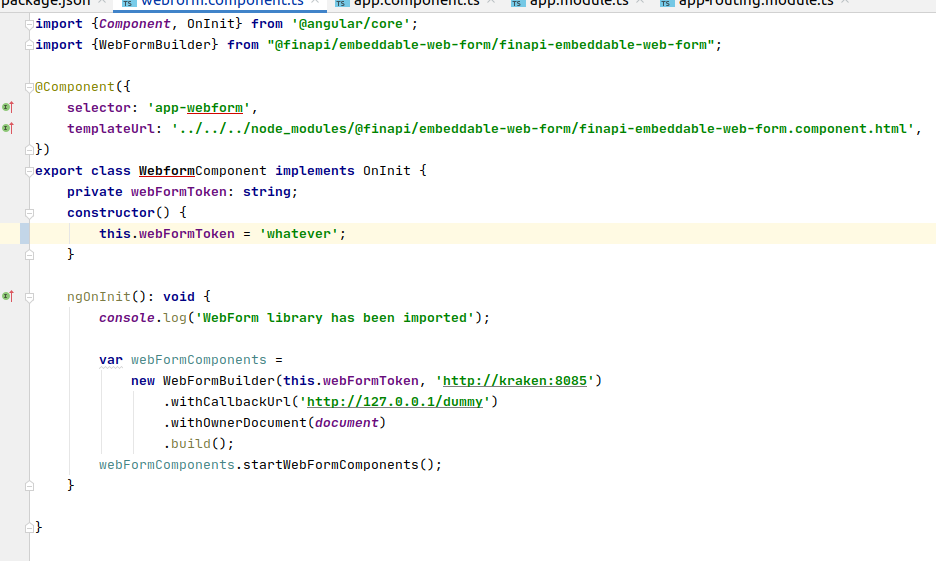
Keep in mind that npm package doesn’t bring you new features that HTML implementation lacks.
It only gives you a way to integrate the web-form without the need to deal with HTML tags.
All new features arrive when a new finAPI version is released.
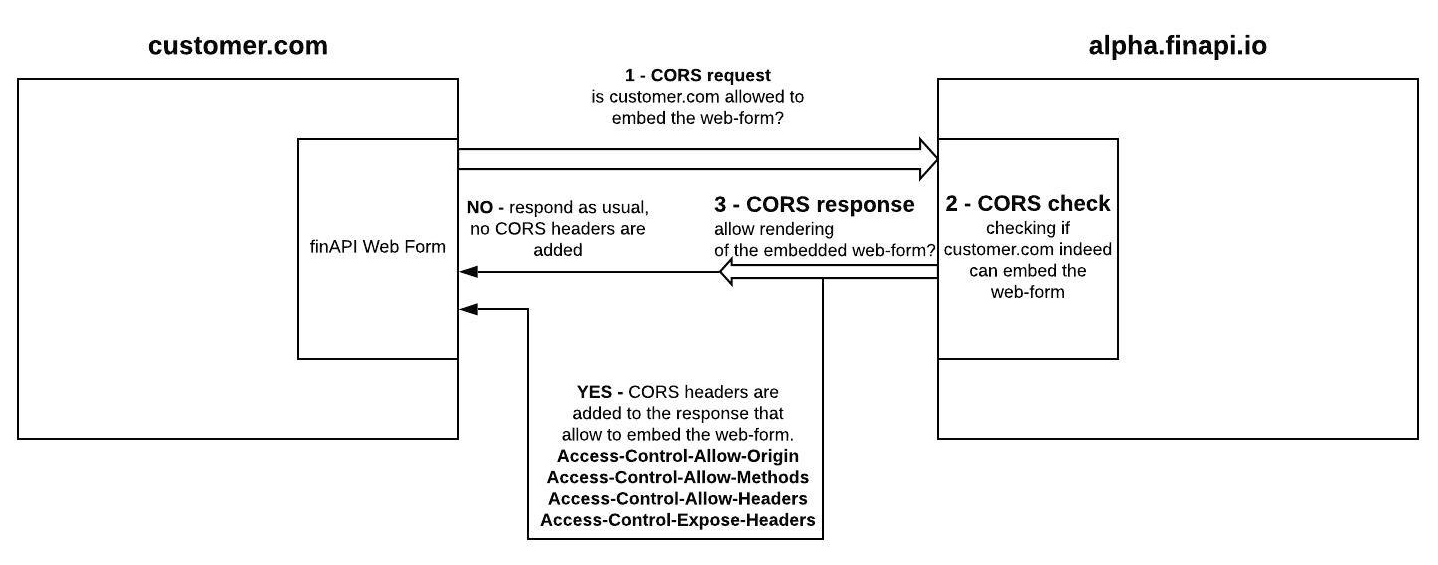
Applying CORS (Cross-Origin-Resource-Sharing) policies
Please contact the finAPI support team to allow our web form to be rendered on your website.
You have to provide the domain name of your website that will contain the finAPI web form.
Here is an illustration of how it works in general:
Dismounting the embedded web-form on-demand
The embedded web-form has a feature to remove itself from the parent DOM if you decide its life-cycle is over. All you need to do is simply pass an Event object to the web-form’s root element.
This should be the parent element of the web-form’s shadow DOM.<web-form-element> is the default root tag.
Please consider the following as an example of removing the web-form from your page:
var webFormContainer = document.querySelector('web-form-element');
webFormContainer.dispatchEvent(new Event('dismount'));
Web Form Components Customization
The finAPI web form components are styled dynamically and accept a number of stylesheets from the parent website. This helps to individualize the web form to suit your needs.
However, the customization process is strict and we allow only a limited number of changes for being compliant with regulatory requirements.
If you’d like to customize the web form in your own special way - please, don’t hesitate to contact finAPI’s support team and raise a request.
The following HTML code represents a data transfer object that demands an embedded web form to change its appearance:
<script type="text/json" id="external-web-form-css">
    {
        "webFormBody": {
            "backgroundColor": "darkviolet",
            "maxWidth": "400px"
        },
        "webFormBtnSubmit": {
            "backgroundColor": "lightseagreen"
        }
    }
</script>
The object contains two fields:
backgroundColor - set your desired color for the web form.
Examples of the color might be found here: https://htmlcolorcodes.com/color-names/maxWidth - defines the web form width.
In addition, the web form might be easily individualized by picking a theme.
You only have to define the theme parameter within the web form’s tag.
Currently, finAPI supports 3 web form’s themes.
1. Light web form (default - no theme is used):
<web-form-element></web-form-element>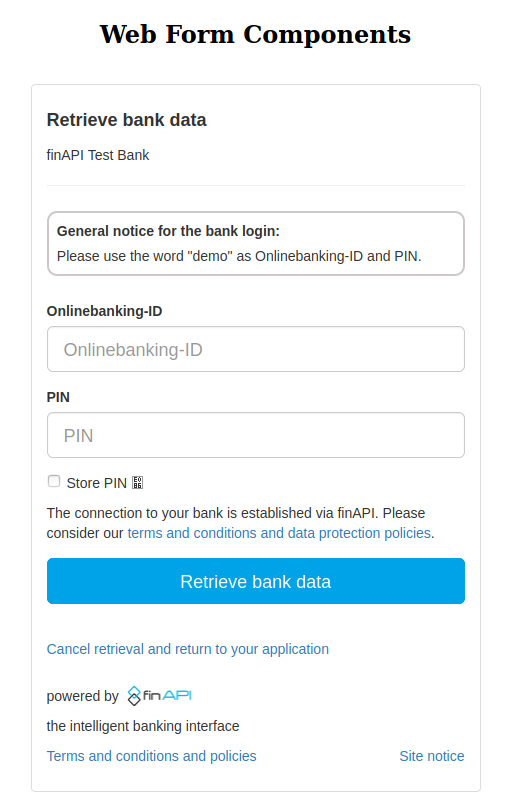
2. Dark web form:
<web-form-element theme="dark"></web-form-element>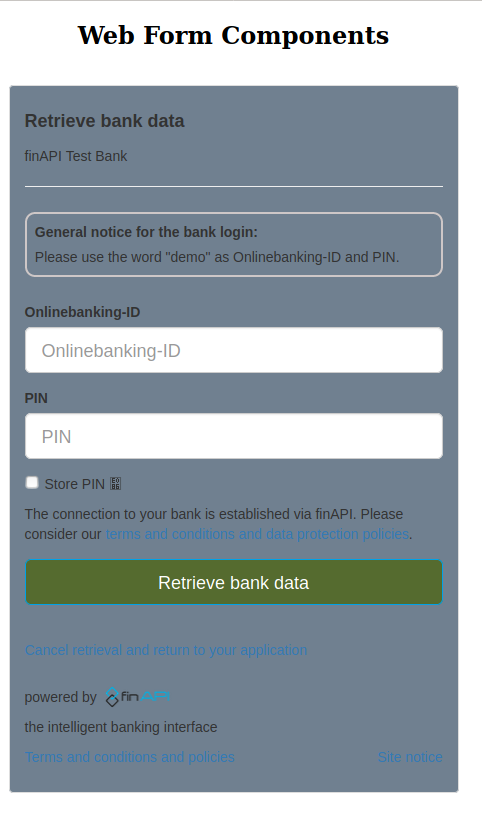
Using callbackUrl and redirectUrl with Web Form Components
callbackUrl - the callback URL demands finAPI to execute a POST request to it once the web-form is completed or aborted.
To add a callback for the embedded web form, you need to add thecallback-urlattribute to the web form’s tag:HTML<web-form-element callback-url="http://127.0.0.1/callback"> </web-form-element>redirectUrl - the redirect URL is used alongside the standalone web-form to redirect its user once the web-form is completed or aborted. This aims to help with moving the user back to a client website or a client application.
However, the embedded web-form forbids the usage of this parameter, since the web-form’s user is already on the client website/application where the web-form is embedded as a component of the page, therefore making no need to redirect the user anywhere else.
That’s the reason the embedded web-form doesn’t support the redirectUrl parameter.
Web Form Components with redirect banks
The Web Form Components can be used to work with XS2A redirect banks.
The embedded web-form produces a new tab for the user and waits until the user completes the authentication process on the bank’s side.
Keep in mind that a redirect web-form waits for its user only for 10 minutes and aborts itself after the timeout.
A standalone web-form operates in the same tab.
Tracking status of Web Form Components
The embedded web-form allows you to track its current status.
This tracking status is represented as a string within a hidden input that reflects the web form’s state.
In order to integrate such feature, you need to add the following tag into your HTML page:
<input id="web-form-status" readonly/>The value of the given input is automatically set by the web-form.
Controlling the Language of Web Form Components
The language of the embedded web-form is controlled by the browser’s locale or, in particular, by the Accept-Language HTTP header.
This header tells the web-form to set the chosen language.
Currently, the web-form supports the following languages:
de
en
cs
sk
The default language is set to German.
Web Form Components Reinitialization
After dismounting the web-form, you can recreate it without reloading the window.
In order to trigger the re-initialization process, you need to pass a CustomEvent object with the type 're-enable' to the 'window' object and provide a new web-form token in the 'detail' property of the event.
Please consider the following as an example:
var event = new CustomEvent('re-enable', {
     detail: {
          webFormToken: 'V2FzIG1hY2hzdCBkdT8K'
        }
    });
window.dispatchEvent(event);
The re-initialization proess also re-injects the web-form tracking element on the parent page by default.
In case you want to auto-hide it, please specify the following directive in the CustomEvent object:
var event = new CustomEvent('re-enable', {
     detail: {
          webFormToken: 'V2FzIG1hY2hzdCBkdT8K',
          autohideTrackingElement: true
        }
    });
window.dispatchEvent(event);
Keep in mind that you should use the web-form's re-initialization only after you've dismounted the old web-form.
Appendix:
Once dismounted, you get the 'webFormData' object in the 'window' object.
That object holds a few elements you might need to know about:
window.webFormData.webFormComponentsSource is an HTML script element. This element is used for re-injecting the web components entry point.
window.webFormData.webFormContainerParent is a parent node of the web-form container element. The components script saves it to re-inject the web-form into the right place after dismounting.
window.webFormData.webFormStatusParentElement is a parent node of the web-form external tracking element. The components script saves it to properly re-inject the tracking input into the right place after dismounting.
The elements are taken from the last web-form before dismounting, but you can change them if you need to before triggering the re-initialization process.
Considerations
While the embedded web-form might be integrated into front-facing web applications, mobile applications (Android/iOS) should always use standalone web-forms.
We strongly discourage our web-form customers from using the web components feature for their mobile apps, since such integration could work unstable.
